


Think of an old rolltop desk with cubbyholes everywhere. That’s Scrivener – it’s like having a magical desk for every project. Each desk has endless cubbyholes, drawers, and slots for scenes, characters, research notes, even a junk drawer, and on and on. You, the writer, put your stuff in the desk. Once you figure out how to best use the desk, all you’re doing is writing.
ON THE PAGE
No Subscription Model
I want to put this upfront because hand’s down, it’s the least amount of money for the biggest bang I’ve ever spent. In a world where every tool writers use are turning into monthly subscription fees, Scrivener remains a single purchase lifetime license. Summer 2026 that price is US $60.
Minor upgrades to date have been free. Major updates with significant feature upgrades or additions are half price. So yeah, $30 every couple of years. I’ve used it for 10 years, and I’d be surprised if I’ve spent $150.
Learning Curve that’s Worth the Time
Scrivener takes time to learn. Time you could spend writing, no doubt about that. But you’ve probably heard writers talk about the software and wondered “How can software help me write?”
Scrivener has attempted to take the mechanics of writing – generating idea lists, gathering research notes, URLS, images, storyboarding and reorganizing, and more – and put these tasks into a robust, organized system (a magical rolltop desk, if you will) that anyone doing a writing project can adjust to their own needs. It’s used by tech manual, blog, non-fiction, academic, prose, poetry, screenplay writers, and more.
If you compose anything with more than two parts, or ever had to search your browser history to find out where you read that fact you want to double-check, then Scrivener will help. The more complex your project is, the more it can help.
Sample of Favorite Features
Then they added on bells and whistles because technology allows it. You can color code documents, mark them anything from draft to final, drag and drop scenes to reorder, assign keywords, track footnotes, sort out scenes and chapters by labels, and other features. What you decide to use is entirely up to you.
Research in Same Doc but NOT in the Word Count
In the same file, in a research folder, you can have character sketches, setting descriptions, images that inspire the project, a note where you stash URLs from research, etc., and they won’t add to your word count – but you can output the whole lot of it if you want, right along with the main manuscript.

Juggling Front and Back Matter for Interim and Final Readers
In the same file, you can also have a front matter and back matter folder, even different ones. Let’s say you want beta readers to see specific information at the beginning of their file, like a placeholder cover image, copyright warning, an explicit date of creation of that version, or instructions. You could have “Beta Front Matter,” “ARC Front Matter,” and “Published Front Matter” and simply choose which front matter you want output with that version of the manuscript. Same thing for back matter.
Work Modes
There’s also an interruption free-mode that will turn off the Internet distractions. Plus a typewriter mode that keeps your current line of typing mid-page. If screenplay’s your thing, it has a mode to indent and format as you type. Prefer to outline with a corkboard view, it’s a simple click.
Or, if none of that is useful to you, you don’t have to use any of it.

Color Coding and Custom Labels
Color coding is a feature I didn’t think I’d find all that useful. I was wrong. I color code by the point-of-view for each scene. As a project gets increasingly complicated, I find being able to read only one “color” at a time immensely useful for continuity and tone.
On shorter projects I use color coding to show which scenes are “rough,” “augment,” and “polished.” These labels can be anything you want.
If you feel extra fancy, you can combine color coding and custom labels. For example, I can use purple and green for two main characters. Then use colors on each label, from pastel to full, that indicates how ready that scene is.
This means that, at a glance, a scene icon that’s lavender is from the POV of the Purple MC and it’s a draft.
I’ve found that helpful for longer projects – that lavender dot pokes me every time I scan the scene list, saying “You still have to finish this one!”
No Generative AI Interface with Local Storage
I care passionately about protecting creative people’s work from theft by generative AI. Many tools now feed our work into genAI as part of our using their product, like editing software done entirely inside their cloud storage.
Scrivener, mid-summer 2026, has no plans to build in a genAI interface. Your work is stored locally and/or in your own cloud storage, not theirs. That means your drafts aren’t being fed into genAI without your consent or the company’s admission. (Looking at you, Google Docs and every other tool that forces you to keep your work in their cloud.)
Sign of the Times: Proof of Work Process
Though I personally object to the need for me to ever prove my work is human created and not genAI, Scrivener allows you to output a screenshot in time of a work in progress. It takes literally seconds and could be done at the end of every writing session.
Such files could go a long way to showing a potential publisher proof of your process over time to compose and self-edit that work. I’m a veteran author with decades of real and online footprints, but I understand new writers are facing challenges on this front.

Highlights of Lessons Learned
THE BIG ONE: Start With an OLD, SHORTER Project
I can’t stress this enough: Do not start a brand new project and learn Scrivener at the same time. Take a short story you wrote in the past and see if you can get it into a Scrivener doc. Use it to experiment with styles and organizing. Storing research and character profiles. Especially use it to practice Compiling / Exporting to Word, Epub, PDF, etc.
The more you use it, the shinier you and it get.
Keep Your Styles Simple
I learned that consistent use of basic styles is essential – life will be much easier when you later map these styles to those you want your output source to use. For example, you can tell Scrivener to tell Word that “heading” style means “title” style in a Word doc and also means H1 in HTML/epub output. This is one of the more frustrating pieces of learning the software, with a lot of trial and error, but when it finally works, OMG, it’s MAGIC.
Think of the complex task of getting “chapter title” with your favorite composing font in Scrivener to be “chapter automatically numbered, times new roman, centered, in bold, 8 lines of blank space above” and so on to match a publisher’s required stylesheet. Or having that same file produce an epub for ARC readers, or a final marketplace with all the fancy fonts, navigation, and formattings – all without you changing a thing in your main file. It’ll do it.
Took a While But I Got There
The learning curve was steep but I can now directly output from one Scrivener file a Word doc that matches my publisher’s specs, a perfect epub with decorative elements and accurate ebook navigation for self-published projects, and a Word doc ready for the final special handsetting that creates a print-ready PDF.
How Simple is Simple When it Comes to Styles?
I learned that an entire fiction manuscript stylesheet doesn’t need more than:
- CHAPTER
- SUBTITLE
- BODY
- HEADING for non-story pages like Dedication, Notes from the Author, Other Works by the Author, etc.
- BLOCK for non-story content like list of other books, copyright info, etc.
- INDENT – like you’d use to set off an epistle, long quote, or any segment that is further indented than the normal prose.
- SCENE BREAK – centered * * * or whatever visual element you want.
Yes, you’ll probably need more styles if you’re going to produce your own final product to sell. For example, a style for buy links and other URLs. That’s down the road, but when you’re ready, you can do that, or create a dropcap style, or a style for centered decorative elements.
You Can Produce Your Own Epubs
I said above that Scrivener has a learning curve. But it’s been worth it to me to work through the intersection of using styles with the steps to output to a flawless epub, including navigation, title page art, and embellishments. With a simple click I can also output the Word doc that will become a PDF and possibly a print version. Scrivener is a DIY dream.
Drawback: No Android Syncing App
Many of my pet peeves were addressed in a long, long, LONG overdue update for Windows. Years overdue. It was worth the wait.
This is still true: there’s no app version (yet, long promised) for Android, which means syncing work done on a mobile device to your Windows desktop is a pain. It can be done, but it’s not pretty. I’ve managed it, but for example my not-so-techy wife doesn’t have the patience for it. Overall, copying out of a Word or Google doc into your Scrivener file is faster if you’re methodical about version control.
If you use Apple products, there’s an app I’m told makes it a snap. I have major envy.
Hidden Bonuses
File Safety
My projects are all resident on my computer, and backed up in versions in the cloud, which means I will likely never lose work again. Plus I have the cloud storage set to keep as many previous revisions as space allows. That means I can revert to earlier versions.
Scrivener’s built-in backups add a security blanket too as they are separately kept in my cloud storage from the main folder of documents. Also, I regularly compile out to a Word doc which also ends up in my personal cloud as well as outside the cloud on my local devices.
When I travel I will sometimes edit the latest Word doc with track changes on because it’s simply easier on my tablet to do so. But it does mean that later I have to transfer these edits/additions by hand to the Scrivener main document.
Stash Cut Scenes Out of View
It supports an on-the-fly creative process. There is a main manuscript area for a project. Any time I cut something I think significant, it’s a snap to copy it to a note outside the manuscript area. All such notes and scribbles get backed up too, and their contents will show up in a search, so good-bye to that feeling that if I cut it I might lose it – and the entire thought – forever.

Little Functions and Features I Appreciate
- It has a find/replace function that will change curly quotes to plain quotes and vice versa.
- Opening an old project that is closest to a new one in overall structure is a “Save As” away from being immediately up and running, including bringing along the notes, character sketches, formatting templates, dictionaries, etc. Perfect for sequels or projects otherwise linked. Seems like a no-brainer, but… (glares at Word’s capricious font and user preference history).
- This one’s hard to explain, but let’s say that I’m freshening up an epub that was released in 2017. Since then I’ve updated my preferred look and feel (fonts, spacing, decorative elements etc.) and I have a recent Scrivener file that has all the Happy Project elements in it.
- First, I “Save As” the 2017 file under a new name. From inside my Happy Project, export all those settings and preferences.
- Next I overwrite the old 2017 info in my new project. That makes a “refresh” project so much faster and easier, and guarantees some look-and-feel consistency across published epubs, etc.
- There’s a feature to paste in new text but apply the existing Scrivener style at the insertion point, versus overwriting them with whatever is embedded in the copy process (such as Word’s bloated stylesheet).
All of these little functions and features are things I discovered along the way by playing with the software myself, or by searching the tutorial and user forum for an answer.
Seriously the curly quote thing is *chef’s kiss.*
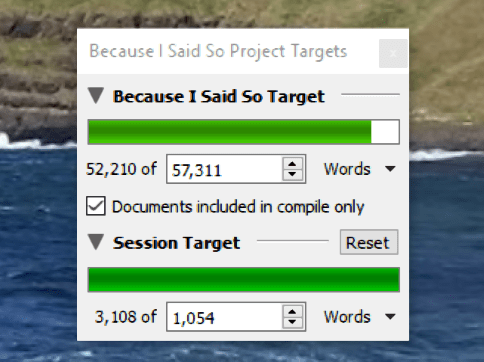
Targets and Goals
It’s a powerful motivator for me:
An Avalanche of Tutorials
Scrivener has the most thorough and painstaking tutorials and documentation I’ve ever seen. To the point of it feeling overwhelming at times as it explains every possible use of the software. There is also a thriving user community with lots of helpful answers and training videos. My wife uses Scrivener for non-fiction with footnotes, endnotes, and other Fancy Elements, and she learned a lot of how to output it for publishers and professors from other users.
Decide for Yourself
Have a visit at their site, see what it offers. The lifetime license price is incredibly reasonable, even if you use it only for research storage, organization, and outlining, where all its easiest to use tools shine so brightly.
This is Not An Ad or Affiliate Post
Just to be clear, I am not receiving any kind of affiliate fee for this post. I believe in the product, plain and simple.
It has become a far more useful and essential tool than I ever thought it would or could be. There’s even a free trial. Grab that old short story and play!
